The most important thing for any digital print on textile is the result; does the design look as intended and is the design misprint free? Unfortunately, quite often errors only become visible once the design is printed on fabric. The printing machine is most of the time blamed for such errors, especially when the resolution is so high that every file error becomes visible when printed. This is because the printer does exactly what it is supposed to do: printing digital files on textile as accurately as possible.
3 preventable file errors for your digital print on textile
As a printing company, you are often working on behalf of others who supply the file. The feeling that you should not touch their submitted file is understandable, as you want to print exactly what the client ordered. However, by reviewing the file thoroughly, you can often prevent painful mistakes. There is no harm in reviewing the file; after all, your customer only wants one thing, and that is a high-quality digital print on textile that represents what he considers to be in the file. In many cases, it is possible to “invisibly” alter the file to prevent mistakes, without any change in the conclusion that the print represents what the customer expects from the original file.
In our Experience Center we always thoroughly review the file before a print job. If we discover mistakes in the file, that may lead to artifacts in the final printout on a high-resolution printer like JAVELIN (1200 dpi), we will alter the file in a way that the mistakes are prevented but the visible end result on fabric will be as expected from the original file. Once the file is approved, we start printing. This is very important to avoid misunderstandings and be absolutely sure that the file is not the cause of design errors. We will discuss the three most important and common errors in printing digital files below.
1. The file’s resolution (and why scaling is not the solution)
The first is an obvious one: the resolution of the file must be correct. This means that the file must have sufficient resolution for the size you will print. If you download a jpeg from Google and print it on a 1.80m fabric, the image is guaranteed to become fuzzy. This is called a Compression Artifact.
What the proper resolution is will vary from job to job, depending on the content of the design. There is no clear rule of thumb for this. Where one design will look good at 300dpi, another file will need to be at least 600dpi. Check this carefully to make sure your resolution fits the design.
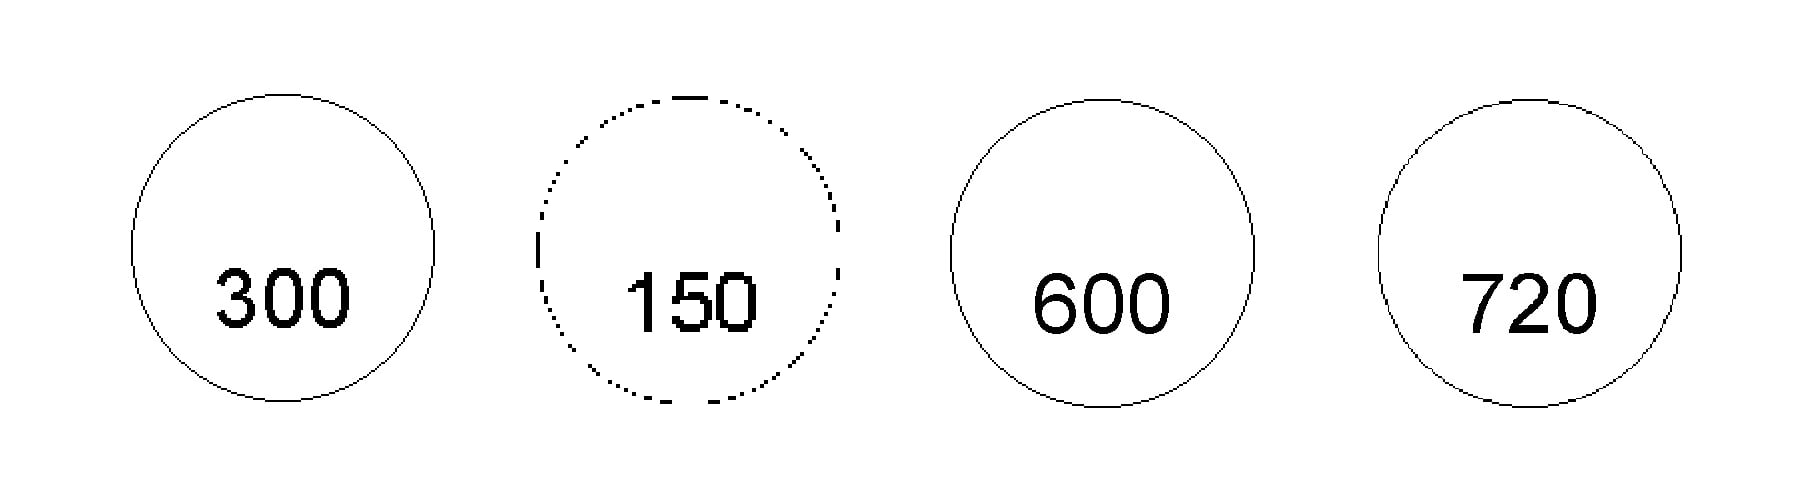
Figure 1. examples of a circle design: a low resolution (150dpi) will result in a broken design, but a high resolution (720dpi) will also show errors.
Perhaps even more important: don't just scale the resolution in photo editing programs! This is especially an issue with printing digital files of Geometrics (designs with regularly recurring patterns). Such files are often 254dpi. The tendency to scale them to 300dpi for a better resolution is understandable, but adjusting the resolution in editing programs has consequences.
- If you scale down, data will be discarded and the design may contain blank spaces (see Figure 1, 150dpi).
- If you scale up to a higher resolution, the program has to add lines that do not exist in the file. This will happen in a repetitive way, which may result in very recognizable patterns for the human eye (see Figure 1).
Both of these cause design errors. Errors that will continuously return when printing digital files of geometric designs. Therefore, it is much better to recreate the geometric file in the proper resolution. This is often not a very challenging task for geometric designs. In the example above: instead of scaling a circle that was made in 254 dpi to 300 dpi, it is better to redraw the circle in a 300 dpi photo editing program, and make it the correct diameter that the circle had in the original 254 dpi file.
In conclusion, resizing a design file cannot be done without risks; you will have to redesign it in a higher resolution. Only then will an error-free result be possible.
2. Color values and visibility
The high resolutions that printers can achieve today present another significant challenge. In the past, printers had a much lower resolution (about 180dpi compared to today's 1200dpi). An often heard misbelief is that this higher resolution is not visible in a digital print on textile. The opposite is true: digital textile printers often manage to print the file much more precisely than is visible on your desktop. See the image on top of this blog: there is a clear visible difference between a 600 dpi (left) and a 1200 dpi (right) print, even on textile!
In the high resolution lies another challenge. The color values in for instance a blotch area in the file will have to be exactly right. Otherwise, there is a good chance of visible differences on the fabric. Even if this is barely perceptible on your screen, the printer will succeed in making the distinction between different shades perceptible thanks to today's high-resolution prints.
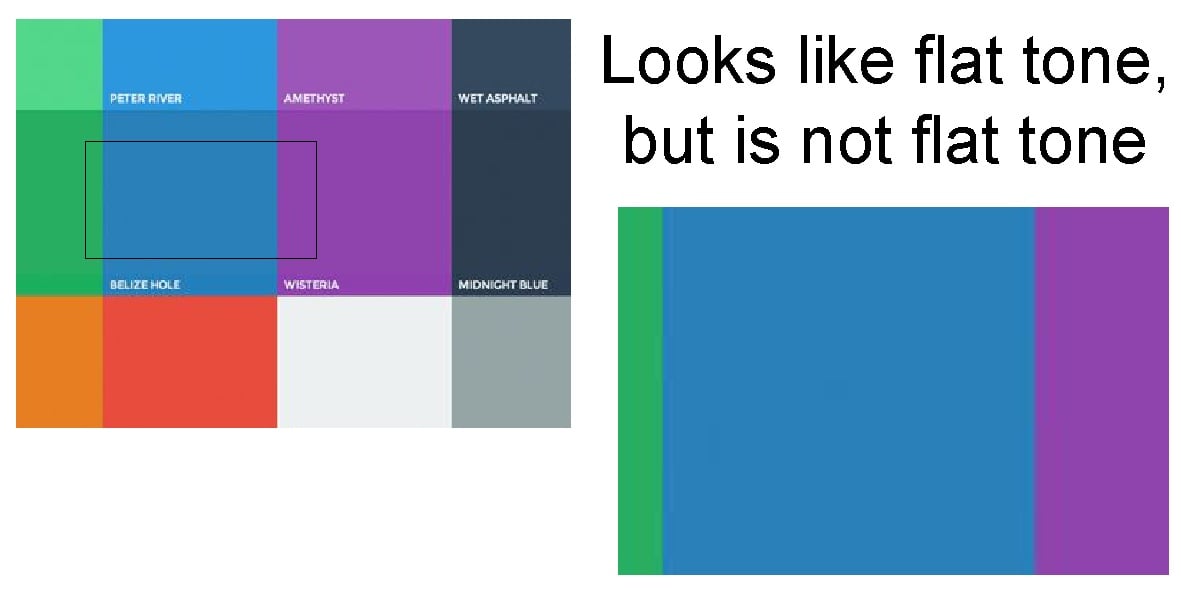
Figure 2. what looks like a flat tone on a desktop, can show differences when zoomed-in or printed on fabric
Something similar can also happen, where too extreme colors are in the design, and the digital printer cannot actually achieve it. A flat oversaturated color can be the result, which is usually not desirable
The printer is often blamed for the errors in the design, while the machine is doing exactly what it is supposed to do: recreate the digital print on textile as accurately as possible.
Therefore, when printing digital files on fabric, always check the color values carefully and make sure that no different tones are used by mistake. Also, check carefully whether the colors you use in your design are feasible for the printer and whether they can be printed on the fabric you use. Most photo-editing software enables you to load the color profile of your printer and show so-called out of gamut colors.
3. Printing Digital Files with Advanced Colors: Trapping as a solution
In a design, you can let your creativity run wild and use any colors you want. This variety of colors will also end up in the file. However, a digital textile printer can only print a certain number of colors. This means that advanced colors must be created by combining primary colors.
Take navy blue, for example. That exact color is not in the printer but has to be created by combining blue, black, and cyan. These 3 different colors have to be printed on top of each other to achieve the desired navy blue. This can certainly be a challenge on fabric, and the slightest inaccuracy can result in color differences.
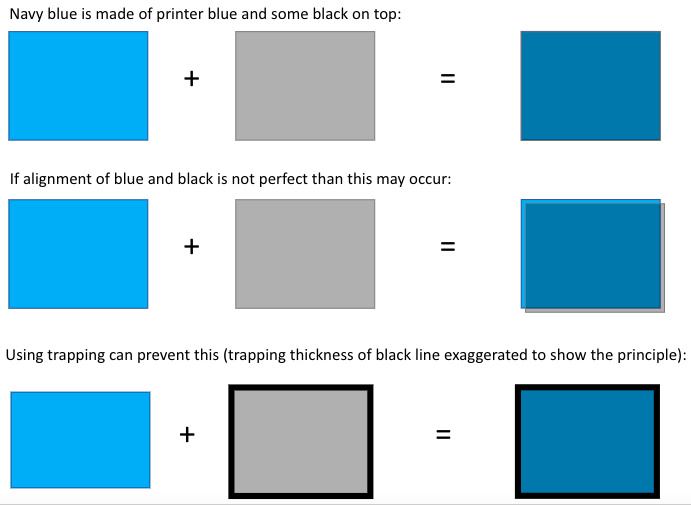 Figure 3. trapping used as a solution for more advanced coloring
One solution that is often used for this is Trapping. This is a term also used in conventional textile printing. The outer pixel border is printed in one color (e.g. black), after which the other colors (in the navy blue example: cyan and blue) are placed inside this border. This reduces the chance of one of the colors being misplaced, which results in an accurate print result.
Making the difference in terms of print results
Checking the file (and making adjustments if necessary) can prevent a lot of rejected prints because of what is interpreted as printing errors. In short, checking the resolution and color values are truly best practices that can make the difference in terms of print results. Does your design contain blotches with advanced colors? Then use Trapping to avoid design misprints.
Starting the printing process with the perfect file is just the beginning. There are other ways Digital Textile Printing can help you achieve new standards for print quality and production speeds. We cover these in more detail in our Digital Textile Printing Guide. Don't have a copy of this yet? Download your free guide here: